| |
|
| |
Registering on a Teamspeak Server the First Time |
| |
If you already know how to connect to Teamspeak and just want more information on streaming audio, please click here.
Registering on a Teamspeak server is easier than you think. It begins first with the obvious step of downloading a free copy of Teamspeak Client and then installing it using the instructions provided. You may download it from http://teamspeak.org.
Once you have successfully installed the Teamspeak client, follow these simple steps to initially login as a guest user. You will then register with the server and select a user name. |
| |
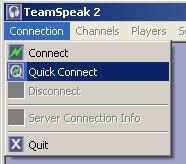
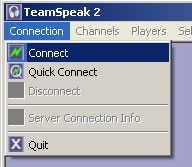
First, connect using a Quick Connect:
|
| |
|
| |
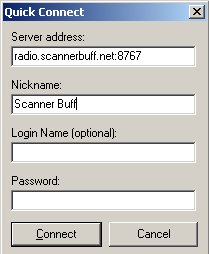
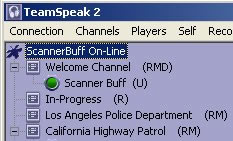
Next, select the Teamspeak server and a Nickname, but DO NOT select a login name or password. Since you have not yet registered with the server this will cause a login failure. Click on Connect and you will connected to the server as a guest using the nickname that you selected. A (U) will appear next to your name to indicate Unregistered.
|
| |
|
| |
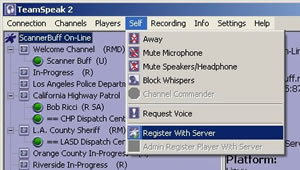
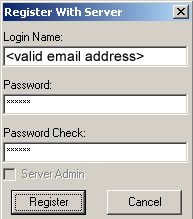
Now that you have logged onto the server you will need to register. To do this, select Self -> Register With Server.
|
| |
|
| |
|
| |
Enter the user name that you will use and a password. This is NOT your nickname, which may be different or the same. Once you have done this, click Register. Once you have registered with the server you will need to disconnect and setup a server profile.
|
| |
Next, click on Connect. Right-Click on Server and begin setting up a server profile for faster logins.
|
| |
|
| |
Enter a label (name) for the server, followed by your publicly displayed nickname, username, and password. This time, click on Registered. We recommend that you also select Auto Reconnect in case you are disconnected from the server. Optionally, you may enter the complete name of your favorite channel, such as Los Angeles Police Department. Upon connection you will be connected directly into this channel. When you have finished, click on Connect.
|
| |
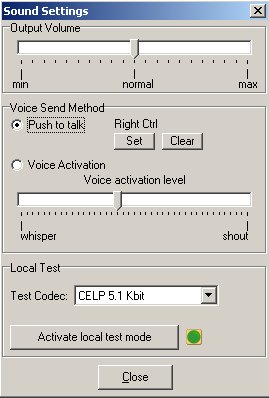
Important: Once you have logged into a Teamspeak server you need to make sure that either your microphone is muted, or you have told Teamspeak to put you into what is known as PTT Mode - Push-To-Talk. This is done by clicking on Settings -> Sound Input/Output. This is necessary because in an unmoderated channel you will echo everything that you are hearing. Unless you are streaming you must be in PTT mode.
|
| |
|
| |
That's all there is to it. You have now registered with the server for the first time. From this point forward you will be able to connect directly to the server. |
| |
| Optional Desktop Icon Modification |
| |
If you find that you regularly login to a Teamspeak server, you can modify the properties of your desktop icon of Teamspeak so that double-clicking on it will immediately log you into your favorite server.
First, locate the Teamspeak icon on your desktop. Right-Click on the icon and then select properties to reveal the dialogue shown next. |
| |
|
| |
In the Target field enter the following information WITH THE QUOTES exactly as shown. Replace the server, username, password, and optional default channel. Each field is separated by a ?. If you omit the default channel do not put the last ? in the line.
|
| |
"C:\Program Files\teamspeak2_RC2\TeamSpeak.exe"
"radio.scannerbuff.net:8767?nickname=NICKNAME?loginname=USERNAME?
password=PASSWORD?channel=YOUR FAVORITE CHANNEL" |
| |
You will enter all of this in the target field without line wraps. Remember to use the quote marks exactly as shown and separate each field with a question mark.
|
| |
| Streaming Audio To The Server |
| |
For a detailed discussion and instructions, please click here. |
| |